You have Apple’s iPhone 6 or 6 Plus? If you have that’s good, configuring your email account on iPhone 6 might be a difficult task to do, but don’t need to worry as here I’ll tell you how to do iPhone 6 email setup? Hopefully, this guide will really help you if you’re still have in trouble of configuring your email on iPhone 6. Below are some easy steps to do, so here we go!
Firstly, unlock your iPhone 6 so that the menu icons will appear in front of you. When menu appears you will see a list of icons there, now look for “Settings” icon and do follow below steps:
Firstly, unlock your iPhone 6 so that the menu icons will appear in front of you. When menu appears you will see a list of icons there, now look for “Settings” icon and do follow below steps:
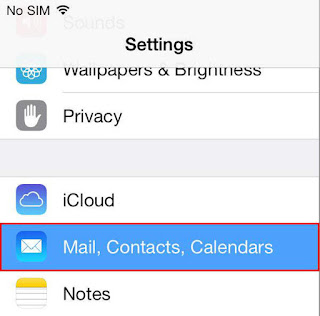
Find “Mail, Contacts, Calendars”
- Lock for your Settings icon from menu.
- Now look for the labeled bar with “MAIL, CONTACTS, CALENDARS”.
- Click on it and get start.
Create New Email Account
- Click on “Add Account” in the section of “Accounts”.
- Now choose the required server or Other.
- In the case: If you choose Other: Just click on “ADD MAIL ACCOUNT”.
Enter Sender Name
Now write here the NAME and the specified key in the name that you want to use as sender name in your email account.
Enter Email Address
Type your EMAIL and specified key in email address area.
Enter Password
Write your PASSWORD and specified key in the password for email account.
Enter Account Name
- Write any DESCRIPTION and specified key in the required description area.
- Now click “Next”.
Enter Incoming Server
In the next section, enter both the incoming and outgoing mail server in settings. Use the settings panel in the mail to enter in each section.
Verification
When you fill each info about your incoming and outgoing server, your iPhone 6 will prompt a verification message to verify the server info. If you’re not using the SSL version of the settings, a warning screen will pops up. You can cancel this and then tap on “Continue” to go further. Again, a warning screen will pop up in front of you, if you wish to read about more details, you can simply tap on Details.
Saving Your Account Info
Now you will shortly view a screen shot checking off your provided info for the email account followed by a display which also has sliders to enable Mail and Notes. At the top most of the display screen, there you see the options to Cancel or Save. Just tap on Save to continue with adding your email account.
Your email account configuration has been completed successfully, now enjoy your iPhone’s services by setting up your email account.
For More Tech News Visit:http://www.knockinn.com/
Here Are The More Latest News: Iphone 6 Email Setup


